Creating the User Interface: Autonomous Mobile Robot DIY Guide

This is the third and final installment of our DIY Autonomous Mobile Robot (AMR) guide. If you haven’t had a chance to explore the first and second parts, we highly recommend reading them before diving into this section.
User interface
OpenAMR_UI is an open-source user interface designed for the intuitive control and management of autonomous mobile robots (AMRs) - its primary focus is on providing a user-friendly experience for effective AMR management. It offers a simple and understandable interface that allows users to monitor telemetry, set up tasks, configure waypoints, and define paths. Built with ease of exploitation, implementation, editing, and redesigning in mind, OpenAMR_UI is optimized for seamless integration with platforms like Linorobot and similar systems and well-suited for use with the Robot Operating System (ROS) Noetic distribution.
Key functionalities
OpenAMR_UI facilitates the creation of detailed digital maps representing the operational environment of the AMR. These maps encompass information on walls, obstacles, and other relevant features. The software allows for:
- Constructing new maps from scratch
- Organizing multiple maps into logical groups for efficient management
- Changing current maps for managing navigation through different floors, etc.
OpenAMR_UI empowers users to define specific routes for the AMR to navigate within the created maps. These routes essentially function as pre-programmed instructions, dictating the AMR's movement and obstacle avoidance strategies. The software allows:
- The creation of multiple routes within a single map, catering to various tasks or objectives
- Setting a specific task at each waypoint to execute it (in development)
With maps and routes established, OpenAMR_UI offers comprehensive control over the AMR's operation. Users can:
- Initiate and terminate robot movement
- Initiate executing different functions on the robot
- Monitor sensors value at a user-friendly interface
- Direct the AMR to follow pre-defined routes
- Visualize the AMR's real-time location and progress on the map interface
Simplicity and open source is an asset
OpenAMR_UI prioritizes usability, even for individuals with limited robotics expertise. The intuitive interface simplifies map creation, route planning, robot control and monitoring statistics.
As an open-source project, OpenAMR_UI is freely available for use and modification. This grants users the flexibility to adapt it to their specific requirements and project goals.
OpenAMR_UI seamlessly integrates with ROS Noetic, a widely adopted framework for robot development. This compatibility ensures its functionality with a broad spectrum of robots and sensor systems.
Architecture description
OpenAMR_UI's functionality relies on a robust architecture composed of interconnected ROS nodes, standard packages, and communication libraries. Let's take a closer look at each of these components, the detailed software nodes, and the package architecture shown in Picture 8.

Picture 1 - User interface packages and nodes architecture
The MapNode node serves as the central hub for map and route management within OpenAMR_UI.
MapNode undertakes several key responsibilities:
- Map management to save and load map data, ensuring the persistence of the robot's operational environment across sessions.
- Route management to handle route creation, editing, and storage, allowing you to define various paths for the AMR.
- Navigation control to launch the necessary ROS nodes responsible for robot navigation based on the defined routes.
- Mapping control to trigger the launch of ROS nodes for map creation or updates, enabling you to modify the environment representation.
The WayPointNavNode node acts as the brain of the robot's navigation.
WayPointNavNode takes main stage when the AMR is actively following a route:
- Once a route is selected, the WayPointNavNode seamlessly guides the robot along the predefined waypoints, executing the navigation commands with precision.
- To handle additional functionalities related to various robot actuators, mechanisms, and sensors, you can utilize the Advanced Functions (optionally).
The UINode node serves as the user interface (UI) and the bridge between the human operator and the robot.
UINode comprises two essential elements:
- UI Application allows you to visualize maps, create routes, control the robot, and access information. This is the graphical interface you interact with, typically written on React framework.
- Operating behind the scenes, the Flask server facilitates communication between the UI and the ROS nodes. It utilizes libraries like roslib.js to exchange data in a standardized format, ensuring seamless interaction.
Standard packages
OpenAMR_UI uses next external packages:
rosbridge_server: this ROS package acts as a translator, enabling communication between ROS and web technologies. It essentially bridges the gap between the robot's internal operations and the web-based UI.web_video_server: as the name suggests, this package facilitates video streaming. It allows you to view a live video feed from the robot's camera (if equipped) directly within the UI, providing valuable visual feedback on the robot's environment.navigation_package(included with Linorobot): this core ROS package provides a comprehensive framework for robot navigation. It encompasses various functionalities, including:- Localization (AMCL package): estimating the robot's position within the environment.
- Path planning (move_base package): generating collision-free paths for the robot to follow to the goal.
- Movement control (move_base package): sending appropriate velocity commands to the robot's wheels or motors to execute the planned path.
gmapping_package(included with Linorobot): this ROS package offers a popular SLAM (Simultaneous Localization and Mapping) solution. It allows the robot to build a map of its environment in real-time while simultaneously keeping track of its location within that map. This map information is often crucial for navigation planning.map_server_package(included with Linorobot): this ROS package acts as a server that manages the map data used by the navigation stack. It essentially loads a map (created beforehand using tools or provided by gmapping) and makes it accessible to other ROS nodes that require it for navigation purposes.
UI description
The Map page gives you a clear view of the robot’s world, there’s a map display to visualize the environment, real-time tracking of the robot’s location, waypoint markers for key navigation points, and interactive map buttons for various controls.The page features a clear map representation of the environment your robot operates in.
On the screen on the page, you can see red and blue triangles. The blue triangle indicates the robot's current position on the map, helping you track its movements, while the red triangles mark the waypoints you've defined for specific routes, providing a visual roadmap for the robot's planned path. There are buttons for zooming in and out and navigating the map, allowing you to focus on specific areas of the environment. These buttons function independently of ROS topics, ensuring a user-friendly experience.
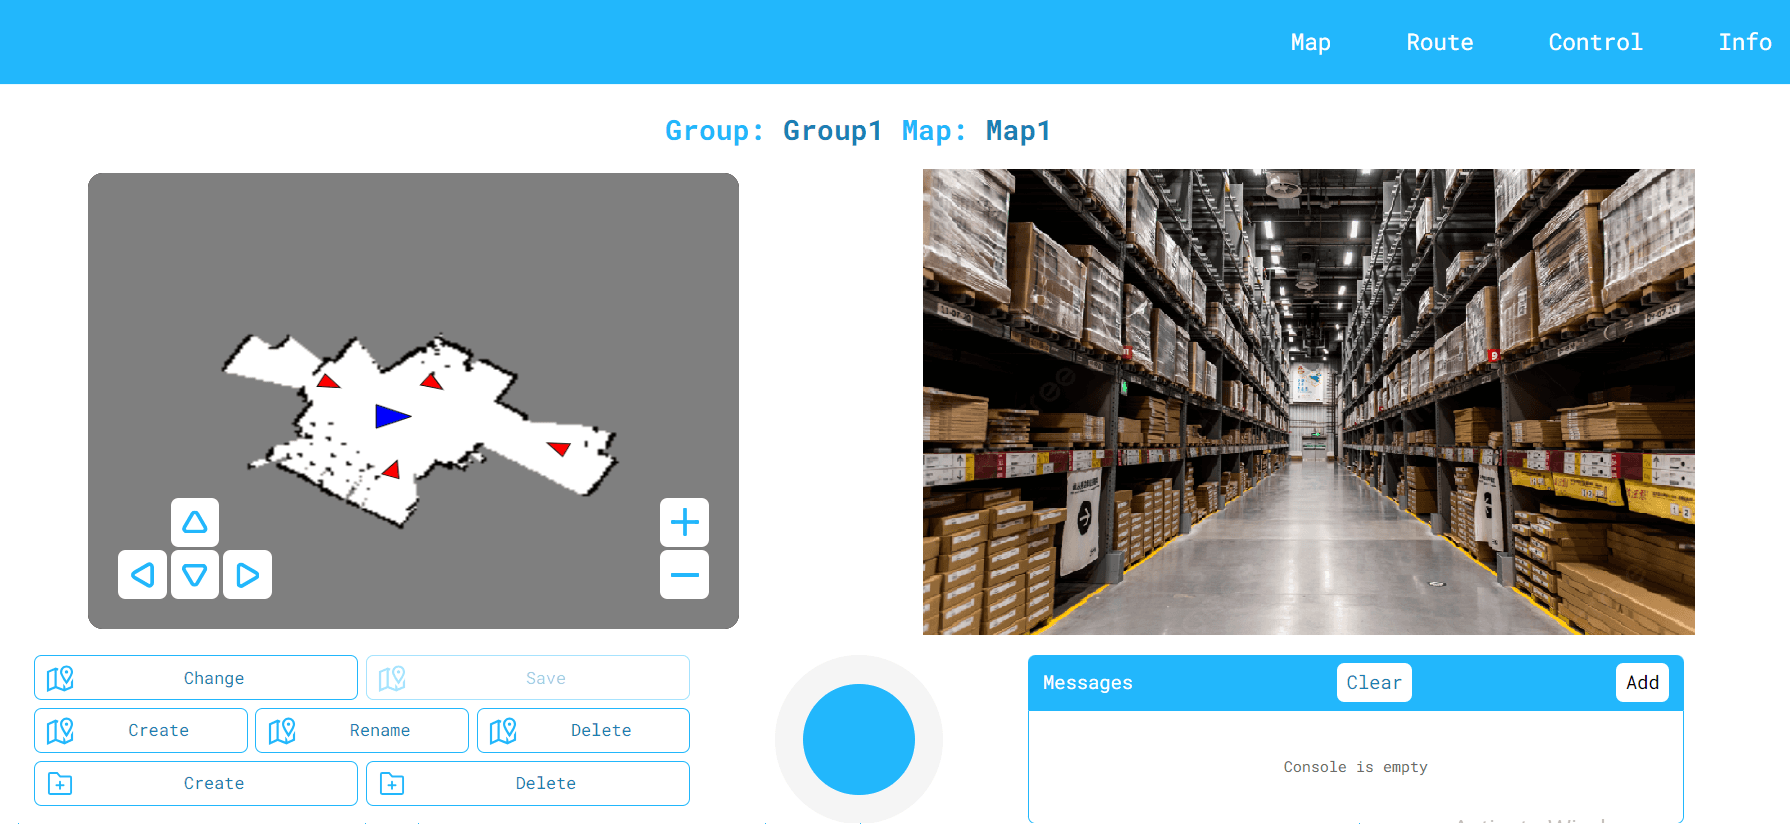
Picture 2 - User interface map page
UINode sends a std_msgs/String message to the /ui_operation topic, which is parsed by other nodes in the ui_package to manage maps and groups - allowing you to create and delete map groups for better organization, as well as to create new maps, rename existing ones, and select the current active map for the robot.
Joystick movements are communicated via a geometry_msgs/Twist message sent to the /cmd_vel topic, where it is parsed by nodes responsible for controlling movement, enabling direct steering of the robot through a joystick interface on the map page.
The top bar displays the currently selected group and active map, providing context for your actions, while the messages section shows updates from various robot processes by visualizing std_msgs/String messages from the /ui_messages topic. Additionally, the Map page may feature a live video stream from the robot’s camera (if equipped), offering a real-time view of the robot’s surroundings to complement the map and enhance situational awareness, helping you monitor the robot’s route, identify obstacles, and better understand its environment.
Route page
The Route page empowers you to define specific paths for your robot to navigate within the maps you've created.
When you click on the buttons, UINode sends the std_msgs/String message to the topic “/ui_operation” and it will be parsed in other nodes of ui_package.
Design new routes by clicking and holding your mouse on the map at desired locations. These points become waypoints, dictating the robot's movement along the path. As you place each waypoint, the system automatically captures its coordinates and orientation. This ensures the robot follows a precise path. Once you've defined the waypoints for your route, click the "Save" button to solidify your plan. This makes the route available for selection and execution by the robot.
On the Route page you can delete routes you no longer need, rename routes for easy identification, edit existing routes by adding, removing, or repositioning waypoints as required, use the "Clear" button to erase all waypoints from a route, essentially starting over.
Also the Route page enables you to choose which route the robot will follow for its next navigation task. This selected route becomes the active one, guiding the robot's movement.
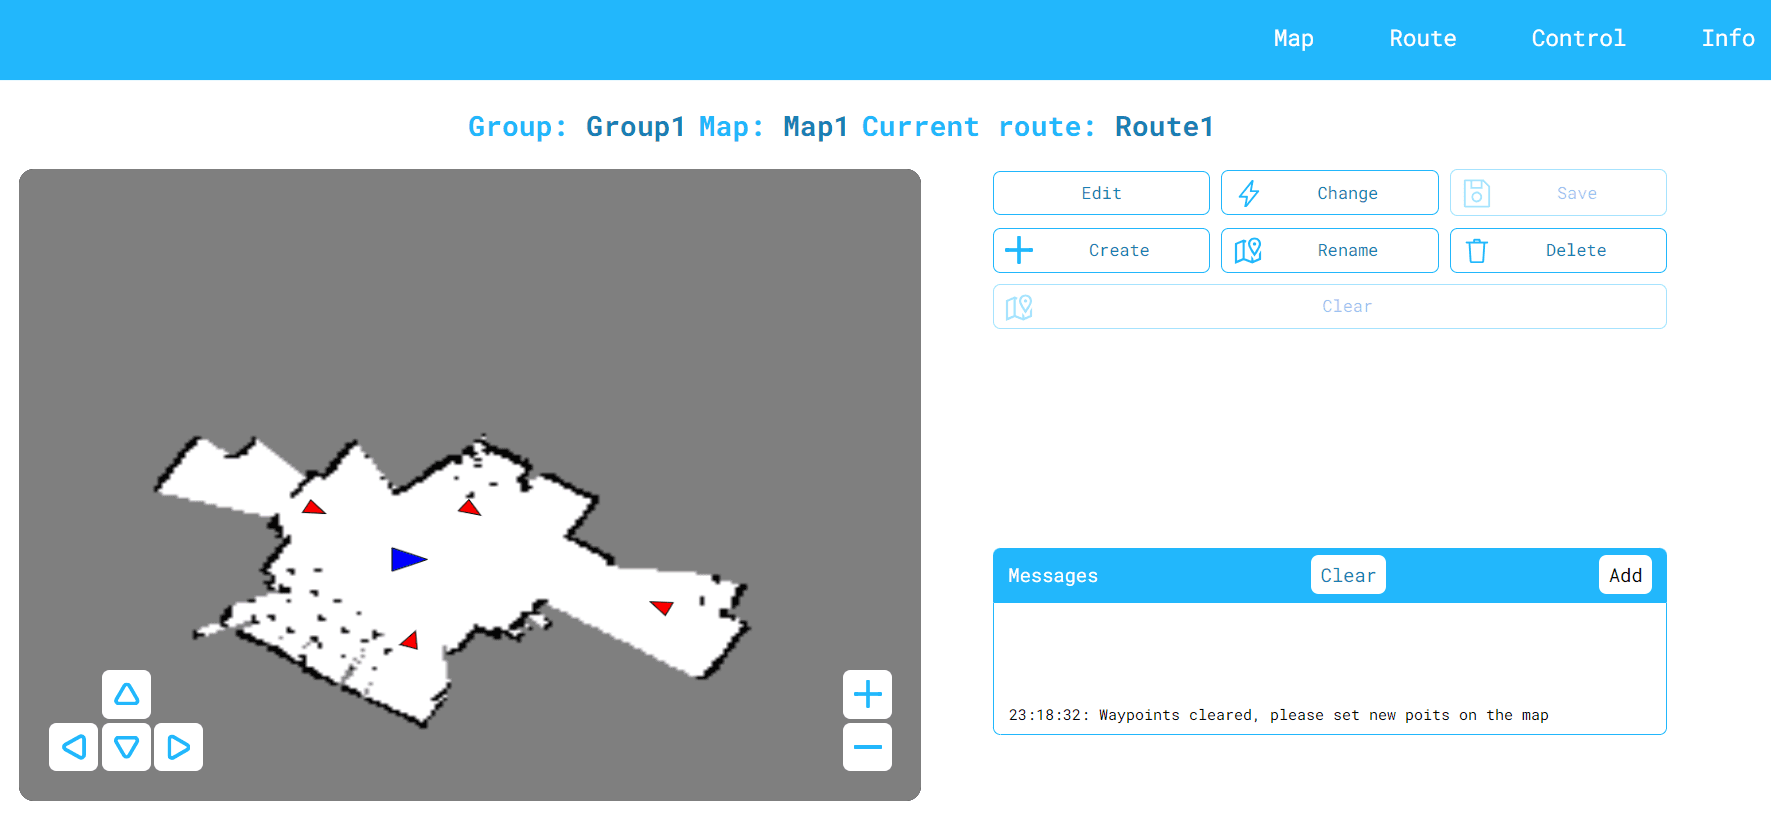
Picture 3 - User interface route page
Monitoring system messages is similar to the Map page. The Messages section is a dedicated area on the Map page that displays informative messages from various robot operations. It receives and visualizes all std_msgs/String messages from the "ui_messages" topic.
The top of the page typically shows the current group, map, and route in use, providing clear context for your actions and indicating the route that will be used for navigation.
Control page
The Control page serves as your mission control center, allowing you to send navigation commands and guide your robot's movements. When you click on the buttons, UINode sends the std_msgs/String message to the topic “/ui_operation” and it will be parsed in other nodes of ui_package/ While it doesn't provide direct, physical control like a remote control car, it empowers you to strategically direct the robot's path.
Here is the list of route navigation buttons and commands:
- Follow/Start: this button initiates navigation along the currently selected route. The system retrieves all the waypoints defined for the route (from file or database) and sends them one by one to the robot's navigation system. The robot meticulously follows each waypoint in sequence, completing the planned path.
- Home: this button instructs the robot to return to its designated home position. The home point is typically set as the starting location used when building the map (often at coordinates [0.0, 0.0]). This functionality is helpful for bringing the robot back to a central location. In the future, we may use such a point, for example, to place a charging station there.
- Previous point: use this button to direct the robot back to the previous waypoint on its current route. This allows you to retrace its steps if needed. If the robot is already at the first waypoint, it will loop around and navigate to the last waypoint.
- Next point: this button commands the robot to proceed to the next waypoint on its current route. This is useful for guiding it step-by-step along the planned path. If the robot is at the last waypoint, it will loop around and head to the first waypoint.
- Stop: this button brings the robot's movement to a halt, interrupting navigation along a route or manual control. This allows you to pause (stop) its operation and regain control.
- Other buttons: the Control page might include additional buttons labeled "functionN_value." These buttons, when pressed, transmit a specific string ("functionN_value") to a designated ROS topic "/ui_operation." This message can be intercepted and handled by custom functions you've programmed, enabling you to extend the robot's capabilities with unique actions.
- Messages section: a dedicated section on the Map page (the same as on other pages) can display informative messages from various processes involved in robot operation. This section receives and visualize all std_msgs/String messages from topic “ui_messages”
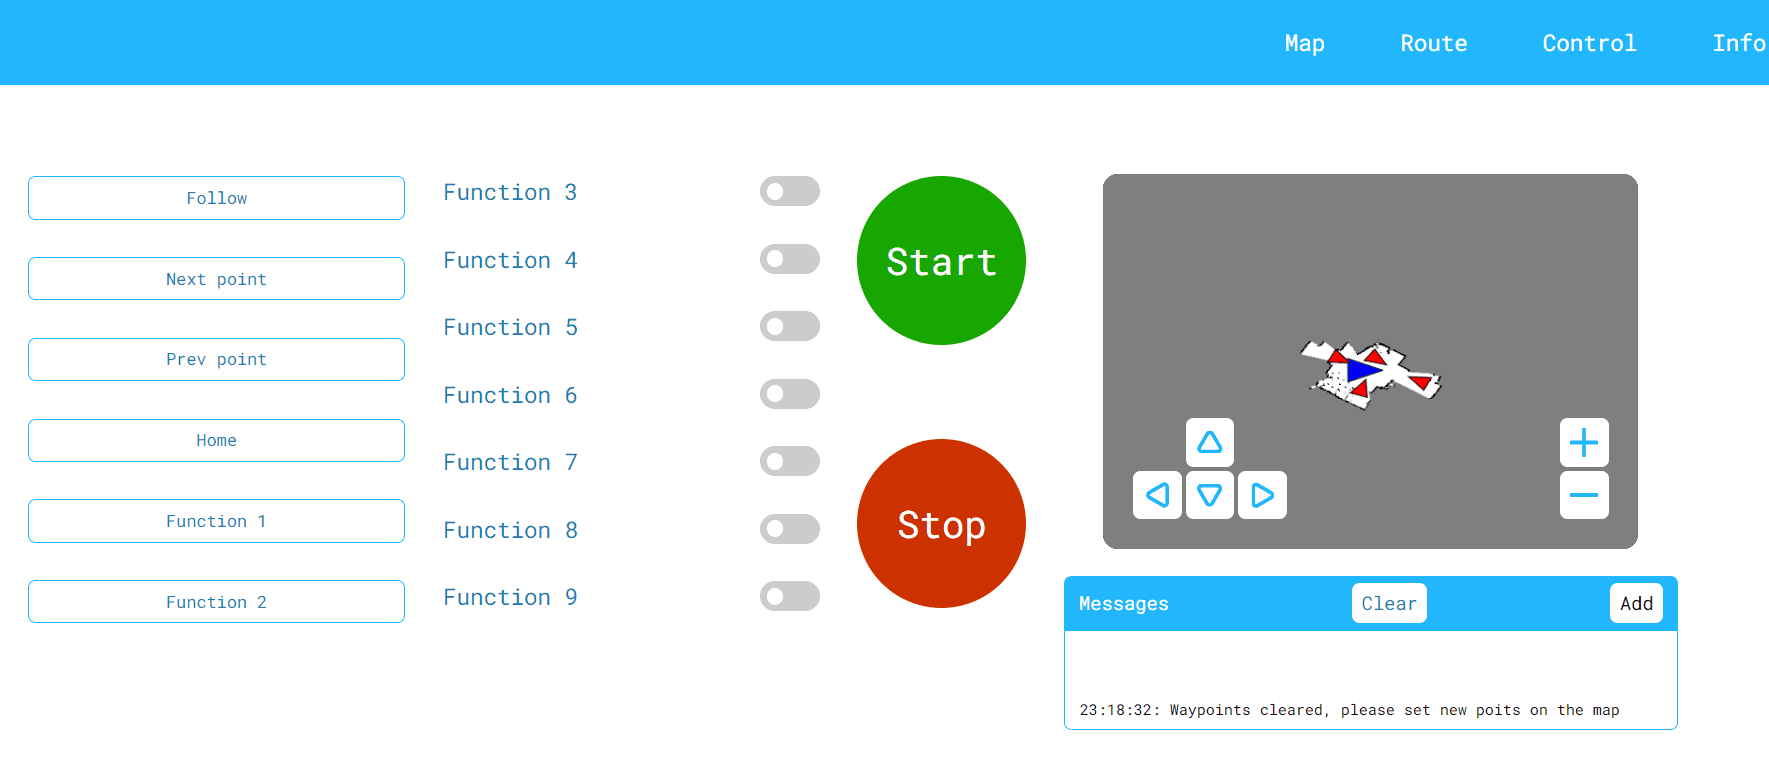
Picture 4 - User interface control page
Info page
The Info page acts as your information hub, providing a comprehensive overview of your robot's status and sensor data (robot telemetry).
You can gain valuable insights into the robot's current performance through live real-time data displays, which include:
- Velocity: monitor the robot's current speed, allowing you to assess its progress and adjust navigation commands if necessary.
- Position: the Info page might visually represent the robot's location on a map, complementing the data and offering a spatial understanding of its whereabouts.
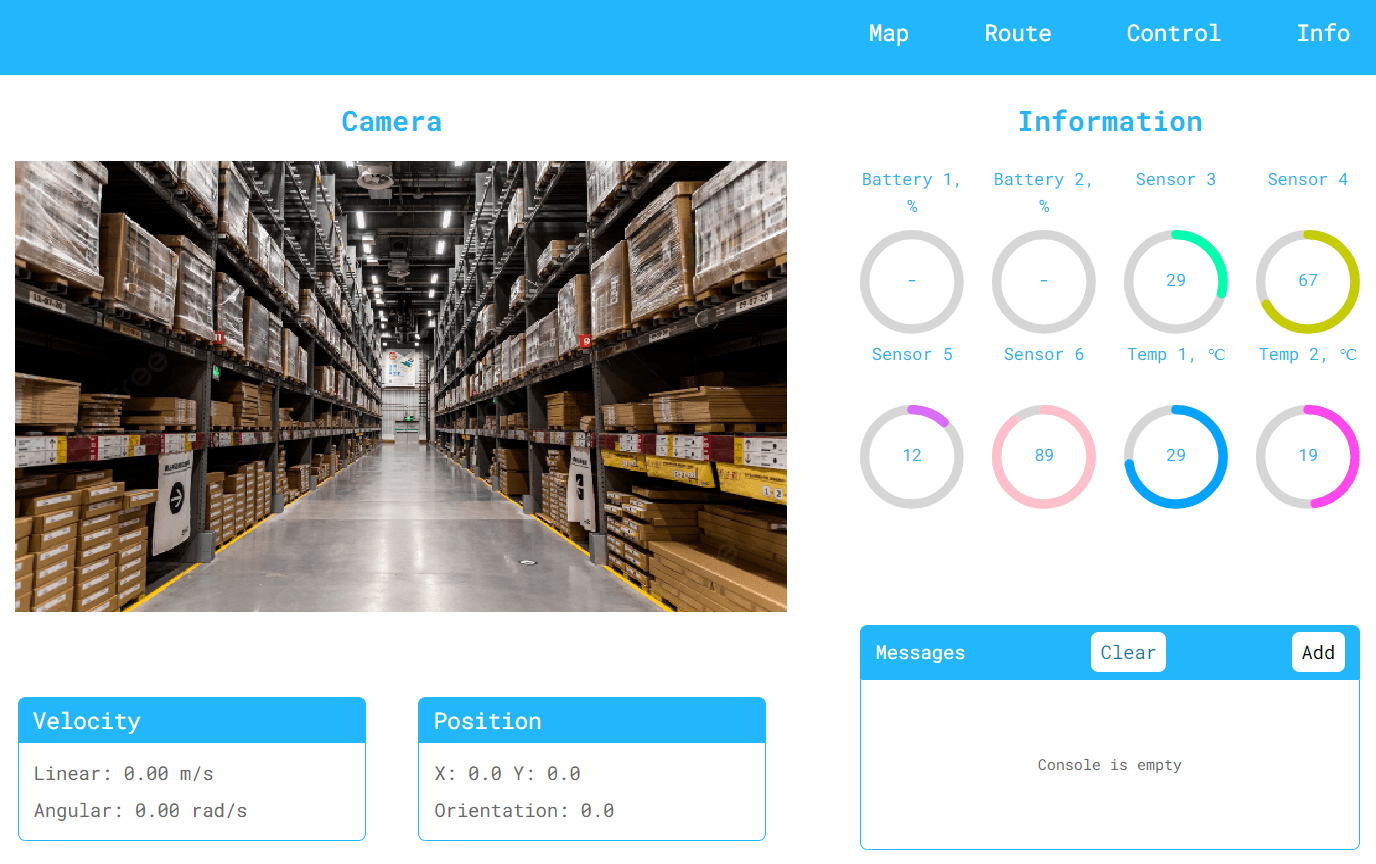
Picture 5 - User interface info page
The Info page retrieves sensor data by subscribing to the ROS topic std_msgs/String "/sensors." This topic acts as a central channel for sensor readings from various sources on the robot. The page might utilize circular bars to represent sensor values visually. These bars typically range from 0 to 100%, providing an easy-to-understand gauge for battery levels, temperatures, or other sensor data that can be interpreted as percentages.
These sensor readings, interpreted and visualized data can provide important information about the robot's environment and internal state. The specific sensors and data displayed will depend on your robot's configuration.
Here are some examples:
- Battery levels: monitor the battery levels of your robot (e.g., "batt1_value" or "batt2_value" for multiple batteries), ensuring timely recharging to avoid disruptions.
- Temperature: keep an eye on temperature readings (e.g., "temp1_value" or "temp2_value" for multiple sensors) to identify any potential overheating issues.
- Other sensors: the page might display data from additional sensors labeled "sensN_value" (where N = 3, 4, 5, 6). These sensors could include things like range sensors, bump sensors, or any custom sensors you've integrated.
On the Info page, if your robot has a camera, a live video stream provides real-time visuals of the robot's surroundings, enhancing situational awareness by allowing you to observe the environment, identify obstacles, and understand interactions as the robot navigates.
On the Map page, the Messages section displays informative system messages from various robot operations, visualizing all std_msgs/String messages from the topic “ui_messages.”
How to install
For your autonomous mobile robot project, essential ROS packages are crucial for tasks such as mapping, localization, and navigation. This guide will help you ensure that all necessary software components (dependencies) are installed before diving into the OpenAMR_UI package.
Required ROS packages:
- move_base
- AMCL (Adaptive Monte Carlo Localization)
- gmapping (Grid Mapping)
- ekf_localization (Extended Kalman Filter Localization)
- map_server
- rosbridge_server
- web_video_server
All packages above are included in the linorobot guide.
Installation steps and prerequisites:
Python 3: ensure you have Python 3 installed.
pip: pip is the package installer for Python.
Git: Git is a version control system for code management.
Step 1:
Install Flask (if not already installed):
pip3 install flask
Step 2:
Clone the UI package repository:
Replace link_on_ui_package_github with the actual URL of your UI package's GitHub repository. Navigate to your desired workspace directory using cd.
cd your_workspace/src
git clone https://github.com/openAMRobot/OpenAMR_UI_package
Step 3:
Build the UI package (assuming it's a ROS package):
Navigate to the root directory of your workspace (where the src folder is located).
cd ..
catkin_make
Executing catkin_make starts building your ROS packages, including the cloned UI package. This may take some time depending on the complexity of the packages.
To configure the UI package locate the config.yaml file within the UI package's param directory (assuming the typical ROS package structure). You can usually find it at:
your_workspace/src/ui\_package/param/config.yaml
Step 4:
Open config.yaml using a text editor.
Edit the configuration parameters to match your specific needs:
appAdress: set the desired IP address for your application (e.g., 0.0.0.0 for localhost access).
topics: define the ROS topics that your UI package will subscribe to or publish from.
launches: specify the launch files (.launch files) that control the robot or run mapping launch. Refer to ROS documentation for guidance on configuring launches.
Step 5:
Save your changes to config.yaml.
OpenAMR UI_Package configuration parameters
odom_topic: /odom needCheckCharger: False charge_station_connected_topic: /charge_station_connected sensors_topic: /sensors navigationLaunch: "ui_package navigation.launch" mappingLaunch: "ui_package mapping.launch" #---------------------------------------------------- appAddress: 192.168.0.103 portBridge: 9090 portApp: 5050 portVideo: 8090
To run the UI you first need to run your base robot SW (navigation, localization etc.) and then you must run the next launch:
roslaunch ui_package start_ui.launch
This command runs the user interface at a web page in the local network. You can find UI at the next address in any browser in local network:
your_ip:your_port
Where ip and port are configurable values. You can change them in the config.yaml file (check it above).
The ui_package can reload some nodes or even run launches, so in the launchesTemplate folder we placed templates for running navigation and mapping nodes. These launches used to run your navigation and mapping nodes.
In the config.yaml file you can change these launches by clarifying the package and launch name. (check config.yaml screen above)
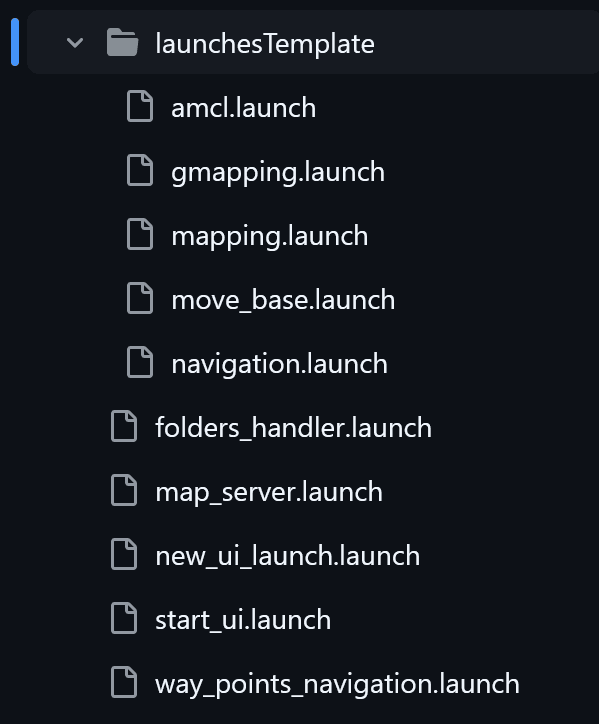
Picture 6 - OpenAMR UI_Package additional launches
Future development
To enhance map editing capabilities, we plan to introduce pixel editing and zone drawing tools. For improved map navigation, features like map rotation, dragging, and zooming with mouse control will be implemented to enhance user experience. To automate map creation, automatic map-building features will be developed, including functionality for identifying uncovered zones. Additionally, users will have the option to customize the appearance of robot markers and points for better visualization.
In route planning and management, we plan to expand options by supporting curved route drawing and automatic route generation between specified points. We will introduce various point types with customizable properties and execution behaviors to differentiate them.
Additionally, route execution will be optimized to allow users to define specific actions for each point, and route manipulation will be enhanced to enable dragging and editing of points on the route.
To increase control flexibility, we will provide camera control options, improve naming conventions by allowing users to rename functions and parameters, and enhance sensor customization with options to rename, specify units, and set minimum and maximum values.
This concludes our three-part guide on building an Autonomous Mobile Robot (AMR) for small businesses. Look out for more content like this in a near future.